In power generators, both the armature and the stator are crucial components responsible for energy conversion through electromagnetic induction. Their failure can result in voltage instability, overheating, or complete generator shutdown. Understanding these components, their function, and how to replace them properly is essential for maintaining generator reliability.
This guide will provide a detailed breakdown of armatures and stators, their differences in AC and DC generators, common causes of failure, and a step-by-step replacement procedure for each component. We will also cover critical safety precautions and post-installation testing to ensure optimal performance.
This article is written for electrical engineers and generator technicians who require an in-depth technical approach.

What Is an Armature?
The armature is the component in a generator where electromagnetic induction occurs, generating electrical power from mechanical motion. Its role depends on the generator type:
- In DC generators: The armature is the rotating component that contains the windings where voltage is induced.
- In AC generators (alternators): The armature is typically the stator (stationary part), while the rotating component (rotor) contains the magnetic field.
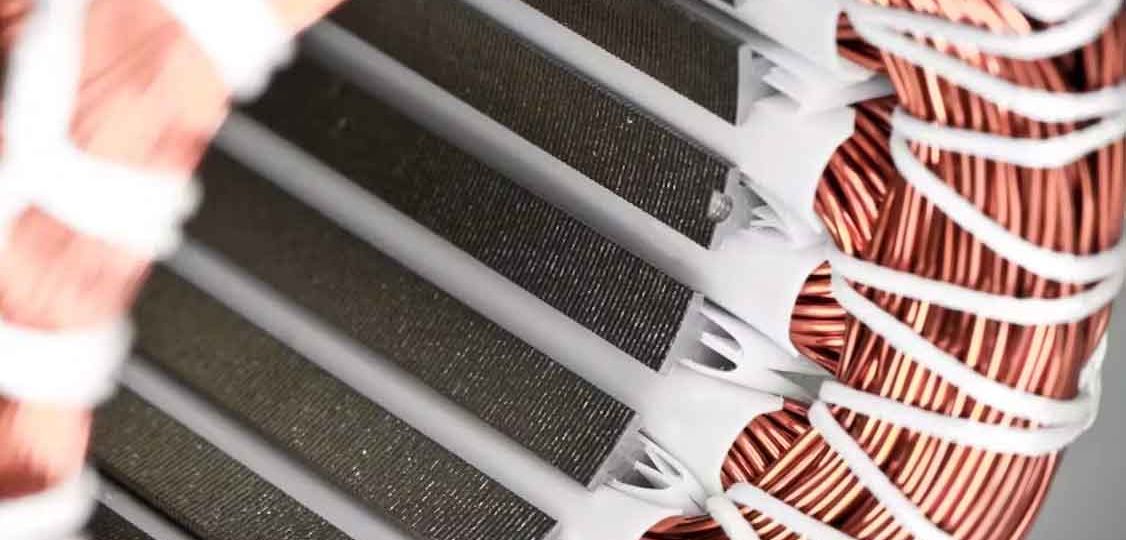
What Is a Stator?
The stator is the stationary part of a generator and houses the field windings or armature windings, depending on the generator type:
- In DC generators: The stator contains the field windings, which produce a magnetic field.
- In AC generators: The stator contains the armature windings, where the alternating current (AC) is induced.

Key Differences Between Armatures and Stators
| Feature | Armature (DC Generator) | Armature (AC Generator) | Stator (DC Generator) | Stator (AC Generator) |
| Function | Generates electricity | Generates electricity | Provides magnetic field | Houses armature windings |
| Motion | Rotates | Stationary | Stationary | Stationary |
| Windings | Conductive windings | Conductive windings | Field windings | Armature windings |
| Component Type | Rotor | Stator | Stator | Stator |
Common Causes of Armature and Stator Failure

Both armatures and stators are critical components in power generators, and their failure can lead to reduced efficiency, voltage instability, and complete generator breakdown.
Understanding the primary mechanical, electrical, and thermal failure modes allows engineers and technicians to diagnose issues early and take corrective actions before catastrophic damage occurs.
Armature Failures
1. Overheating
Overheating is one of the primary causes of armature failure and can result from multiple factors, including:
- Excessive Load – When a generator is subjected to loads beyond its rated capacity, the armature windings must carry more current than designed. This leads to I²R (Joule) heating, which can degrade insulation, cause copper expansion, and eventually short-circuit the windings.
- Poor Ventilation – Generators require proper airflow to dissipate heat. If cooling vents are blocked by dust, dirt, or debris, the temperature inside the generator rises, accelerating insulation breakdown.
- Insulation Breakdown – As the insulation ages, it becomes brittle and less effective at preventing electrical arcing and short circuits. The breakdown of insulation is further accelerated by repeated thermal cycling, where the temperature rises and falls rapidly during load fluctuations.
Warning Signs of Overheating:
✅ Increased winding resistance
✅ Discoloration of copper windings (dark or burnt appearance)
✅ Burnt odor near the generator
✅ Frequent generator shutdowns due to temperature alarms
2. Mechanical Wear
Mechanical wear is a natural consequence of prolonged generator operation, but certain conditions can accelerate the degradation of key armature components:
- Bearings – Bearings support the rotating shaft of the armature. Over time, they can wear out due to friction, contamination, or insufficient lubrication. Worn bearings can lead to misalignment, increased vibration, and excessive noise.
- Commutator Degradation (DC Generators) – In DC generators, the commutator is responsible for rectifying AC voltage into DC output. Over time, commutator segments can become pitted, worn, or contaminated with carbon deposits from brushes, reducing electrical efficiency and causing sparking.
- Windings Stress and Fatigue – Continuous operation under heavy load causes mechanical stress in the windings, which can lead to fractures in the copper conductors or loosening of the winding structure.
Warning Signs of Mechanical Wear:
✅ Increased vibration and noise levels
✅ Irregular voltage output (especially in DC generators)
✅ Excessive wear on commutator brushes
3. Short Circuits
Short circuits occur when damaged insulation allows unintended current paths between windings or between the winding and the generator frame. The most common causes include:
- Physical Damage – External impacts, improper maintenance, or aging can compromise winding insulation.
- Contamination (Oil, Moisture, or Dust) – Conductive contaminants can form leakage paths, leading to phase-to-phase or phase-to-ground faults.
- Manufacturing Defects – Poor-quality windings, improperly applied insulation, or loose connections can contribute to early short-circuit failures.
Warning Signs of Short Circuits:
✅ Sudden drop in generator voltage output
✅ Burning smell and localized heating in windings
✅ Tripping of circuit breakers or protective relays
4. Vibration and Misalignment
Vibration is a major concern for rotating machinery, and in generators, excessive vibration can significantly reduce the lifespan of the armature:
- Unbalanced Rotors – If the armature is not properly balanced, centrifugal forces can cause uneven wear and stress on the bearings and windings.
- Shaft Misalignment – If the shaft is not aligned with the prime mover (engine or turbine), it can cause excessive bending forces on the armature, leading to shaft fatigue and winding deformation.
- Loose Windings – Repeated vibration can loosen the windings, causing them to shift out of place and potentially short-circuit.
Warning Signs of Vibration Issues:
✅ Unusual noise or humming sounds
✅ Premature bearing failure
✅ Loose or broken windings upon inspection
Stator Failures
1. Insulation Breakdown
The stator windings are protected by insulation to prevent electrical shorts and leakage currents. Insulation failure is a serious issue that can lead to complete generator failure. The most common causes include:
- Overvoltage Stress – Generators subjected to frequent voltage spikes or harmonics may experience dielectric breakdown in the insulation material.
- Overheating – Excessive temperature weakens insulation over time, making it brittle and prone to cracks.
- Moisture Ingress – Stators operating in humid environments or exposed to water can suffer from insulation degradation due to the absorption of moisture.
Warning Signs of Insulation Breakdown:
✅ Decreased insulation resistance (can be measured with a megohmmeter)
✅ Electrical leakage to ground
✅ Excessive heating in the stator core
2. Winding Shorts or Opens
Stator winding faults can occur in two forms:
- Short Circuits in the Windings – If the insulation between coils fails, current will bypass part of the winding, leading to unbalanced magnetic fields and excessive heating.
- Open Windings – A break in a winding circuit can prevent the generator from producing full output voltage, leading to unstable operation.
These issues can arise due to mechanical stress, thermal degradation, or improper maintenance.
Warning Signs of Winding Shorts or Opens:
✅ Voltage imbalance between phases
✅ Unstable or reduced generator output
✅ Burnt or damaged winding insulation
3. Magnetic Field Weakening
In an AC generator, the strength of the magnetic field within the stator is crucial for maintaining proper voltage output and efficiency. Over time, the stator’s ability to sustain a strong magnetic field can diminish due to:
- Aging of the Field Windings – Copper windings deteriorate over time, leading to a gradual loss of magnetizing current.
- Overheating and Thermal Cycling – Repeated expansion and contraction of windings due to temperature fluctuations can create microcracks in the insulation, reducing efficiency.
- Loose Core Laminations – If the laminated steel core in the stator becomes loose, it can cause eddy current losses, reducing overall generator efficiency.
Warning Signs of Magnetic Field Weakening:
✅ Gradual voltage drop even under normal loads
✅ Increased excitation current demand
✅ Audible humming from the stator core

Preventive Measures to Avoid Armature and Stator Failures
Preventive maintenance is critical for ensuring the reliability, efficiency, and longevity of a generator’s armature and stator. A proactive approach can minimize unplanned downtime, reduce repair costs, and extend the operational life of these essential components. Below is a detailed breakdown of each preventive measure and its importance.
1. Perform Regular Insulation Resistance Testing
Why It Matters
The insulation system in the armature and stator windings prevents electrical leakage, short circuits, and premature failures. Over time, insulation can degrade due to factors such as thermal stress, moisture absorption, contamination, and aging.
A megohmmeter (insulation resistance tester) is used to assess the integrity of insulation by applying a high DC voltage (typically 500V to 5kV) and measuring the resistance. Low resistance values indicate deterioration, contamination, or moisture presence.
Testing Procedure
- Ensure the generator is offline and disconnected from power.
- Clean the winding surfaces to remove dust, oil, and moisture.
- Use a megohmmeter to apply the appropriate test voltage (refer to manufacturer specifications).
- Measure the resistance and compare it with baseline values. A reading below 1 megohm per kV of rated voltage is a warning sign.
- Perform Polarization Index (PI) testing—this involves taking readings at 1 minute and 10 minutes. A PI ratio below 2.0 suggests insulation degradation.
Recommended Testing Intervals
✅ Quarterly for industrial generators
✅ Annually for standby generators
✅ Before and after long periods of storage or inactivity
2. Ensure Proper Cooling and Ventilation
Why It Matters
Excess heat is one of the leading causes of insulation failure, conductor expansion, and winding degradation. Overheating can result from blocked air pathways, inadequate cooling fans, or high ambient temperatures.
Best Practices
- Keep ventilation openings clean—dust accumulation restricts airflow, leading to hot spots.
- Check cooling fan operation—worn-out or misaligned fans reduce cooling efficiency.
- Inspect heat exchangers and radiators in liquid-cooled generators for clogs or leaks.
- Ensure ambient temperature is within operational limits—generators operating in hot or confined spaces may require additional cooling measures.
- Monitor winding temperatures with embedded RTDs (Resistance Temperature Detectors)—high readings indicate potential issues.
3. Monitor Vibration Levels and Conduct Shaft Alignment Checks
Why It Matters
Excessive vibration can cause bearing damage, misalignment, winding loosening, and structural fatigue in both the armature and stator. Misalignment between the generator and its prime mover (engine or turbine) creates unnecessary mechanical stress, leading to premature wear.
Best Practices
- Use a vibration analyzer to measure displacement, velocity, and acceleration.
- Readings above 0.15 inches per second (IPS) RMS may indicate an issue.
- Conduct laser shaft alignment checks to ensure the generator and prime mover are perfectly aligned.
- Inspect and replace worn-out bearings—listen for abnormal noises and check for excessive play in the shaft.
- Tighten mounting bolts—loose bolts can lead to shifting and increased vibration.
- Use shock-absorbing mounts or dampers for installations subject to frequent mechanical stress.
Recommended Testing Intervals
✅ Monthly vibration analysis for continuously running generators
✅ During every maintenance shutdown for standby generators
4. Use High-Quality Lubricants for Bearings to Reduce Mechanical Wear
Why It Matters
Bearings are critical for smooth armature rotation. Poor lubrication, contamination, and overloading can lead to premature bearing failure, causing shaft misalignment, excessive noise, and overheating.
Best Practices
- Use manufacturer-recommended lubricants—different bearings require specific grease formulations (e.g., lithium-based, polyurea, or synthetic grease).
- Apply the correct amount of lubrication—both under-lubrication and over-lubrication can cause failure.
- Over-greasing can lead to high internal pressure, increased heat, and grease migration into windings.
- Inspect bearings for wear—look for pitting, discoloration, or excessive play.
- Implement a scheduled lubrication program—follow manufacturer guidelines for re-greasing intervals.
Lubrication Frequency Guidelines
✅ Every 3 to 6 months for generators running continuously
✅ Every 12 months for generators on standby service
5. Keep the Generator Clean and Protect It from Dust, Oil, and Moisture Ingress
Why It Matters
Contaminants such as dust, oil mist, salt, and moisture can severely impact generator performance by causing insulation degradation, electrical leakage, and corrosion.
Best Practices
- Use air filters and enclosures—generators operating in dusty environments should have sealed ventilation systems.
- Regularly inspect and clean windings—use dry compressed air (at moderate pressure) to remove dust.
- Keep oil leaks under control—oil ingress can damage insulation and attract dust.
- Monitor humidity levels—install space heaters inside the generator housing to prevent condensation when the generator is idle.
- Apply protective coatings to windings—anti-corrosive and moisture-resistant varnishes can enhance insulation life.
Recommended Cleaning Intervals
✅ Every 3 months for industrial generators
✅ Before and after long storage periods
6. Perform Thermal Imaging Scans to Detect Overheating Components Before Failure
Why It Matters
Thermal imaging is a non-invasive diagnostic tool that helps identify hot spots, loose connections, overloaded circuits, and insulation degradation before they lead to critical failures.
Best Practices
- Use an infrared (IR) camera to scan generator windings, bearings, and terminals.
- Compare heat signatures to baseline readings—any abnormal rise in temperature suggests an issue.
- Check for uneven heating in the stator windings, which may indicate an unbalanced load or faulty phase.
- Monitor cooling system efficiency—thermal scans can reveal areas where airflow is restricted.
- Integrate thermal inspections into routine maintenance schedules.
Recommended Thermal Inspection Frequency
✅ Quarterly for continuously running generators
✅ Annually for standby generators
Step-by-Step Guide to Replacing an Armature or Stator in a Power Generator

Tools and Equipment Required
- Multimeter (for voltage and resistance testing)
- Insulation tester (Megohmmeter)
- Torque wrench
- Bearing puller
- Allen wrenches and socket set
- Cleaning solvents and rags
- Protective gloves and safety goggles
Step 1: Safety Precautions and Generator Shutdown
- Disconnect the generator from power – Ensure no live current is present.
- Allow the generator to cool – If recently operated, wait at least 30 minutes.
- Lockout/Tagout (LOTO) procedures – Prevent accidental startup per OSHA guidelines.
- Ground the generator – Attach a grounding strap to discharge static electricity.
- Replacing an Armature (DC Generators)
Step 2: Removing the Damaged Armature
- Remove the generator housing – Use the proper tools to access internal components.
- Disconnect the electrical connections – Label terminals for correct reinstallation.
- Extract the commutator brushes – If applicable, ensure no damage to brush holders.
- Remove the bearings and end shields – Use a puller to avoid unnecessary damage.
- Unbolt and slide out the armature – Handle with care to avoid winding damage.
Step 3: Installing the New Armature
- Inspect the replacement armature – Ensure no defects or shipping damage.
- Lubricate and install new bearings – Secure smooth operation and alignment.
- Insert the new armature carefully – Avoid forcing the windings into position.
- Reinstall the commutator brushes – Ensure proper alignment and pressure.
- Secure electrical connections – Reattach all terminals per the wiring diagram.
Replacing a Stator (AC Generators)
Step 2: Removing the Damaged Stator
- Remove the generator housing – Access the stator by unbolting the outer casing.
- Disconnect the stator windings – Label wires to avoid misconnection.
- Remove the rotor assembly – This may require a hoist for large generators.
- Unbolt and extract the stator – Carefully slide it out to prevent damage to the windings.
Step 3: Installing the New Stator
- Check the replacement stator for defects – Look for visible damage.
- Align and mount the stator – Secure it with the correct torque values.
- Reinstall the rotor assembly – Ensure proper air gap alignment.
- Reconnect the stator windings – Match the correct wire configuration.
Step 4: Post-Installation Testing
- Check continuity and insulation resistance – Use a multimeter and megohmmeter.
- Verify rotor-stator alignment – Rotate manually before startup.
- Monitor generator voltage output – Test with a controlled load.
- Check temperature and vibration levels – Ensure no abnormal operation.
Find your spare parts for power generators here and buy them online. Easy, fast and with a discount

Contact us to confirm product availability before adding to cart.
Contact us to confirm product availability before adding to cart.
Contact us to confirm product availability before adding to cart.
Contact us to confirm product availability before adding to cart.
Final Considerations
- Use OEM-approved replacement parts for durability and performance.
- Maintain proper alignment to prevent vibrations and overheating.
- Perform regular insulation testing to detect early signs of failure.
- Monitor generator performance under different loads to ensure reliability.
Replacing an armature or stator in a power generator is a complex but essential maintenance task for ensuring power reliability. Understanding their roles, common failure modes, and proper replacement techniques will help electrical engineers and technicians prolong generator lifespan and prevent costly failures.
Regular preventive maintenance, thermal monitoring, and electrical testing are key to detecting potential issues early and ensuring uninterrupted power generation.